Tuesday 19 January 2016

Bread... the Recipe

OK, so here’s how you make these scrumptious french sticks.
Assemble your ingredients... you need only flour, sea salt, yeast, and olive oil. This is my first try with this Italian flour. Not to worry, I have made these baguettes with regular all purpose flour, with terrific results.


Mix and proof for 5 min or until blooming and scented:
1 ½ cups of warm tap water in a measuring cup
1 tsp sugar (the sugar will help feed your yeast)
1 ½ tsp yeast  

Pour the yeasty liquid into 3 ½ cups of flour and 2 tsp salt and mix with a spatula... until a ragged dough ball sticks together.  Don't worry if it's all craggy and lumpy. It's totally ok.

Dump it onto the counter and then knead it for about 5 minutes, until the dough is relatively smooth.

It should look like this (below) once you've kneaded it a bit... see how all the flour has been picked up by the dough ball?


Pop the dough back into the same mixing bowl (no need to clean it) and slick it with some olive oil.  Cover it with a clean dry tea towel, and let it rise for an hour, or until it has doubled in size.  I let mine rise on the stove after having turned the oven on for a few minutes, so it is always nice and warm for good rising.

Dump that gorgeous ball of dough onto the counter, which should be sprinkled lightly with flour.  

Cut and shape the dough into 3 or 4 french sticks, placing them onto floured parchment paper.  Don't be all picky about them looking perfect... those lumps and bumps make it extra crusty and perfectly imperfect after baking.

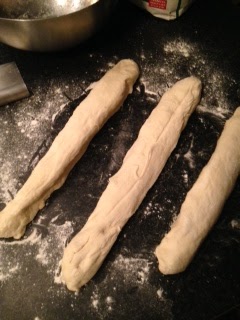
Let the formed baguettes rise for a second time (covered). This should take another hour.

Preheat your oven to 475 degrees Fahrenheit with a foil pan or baking pan onto the bottom rack of the oven. You’ll be tossing a cup of water into that pan when you pop the baguettes into the hot oven.
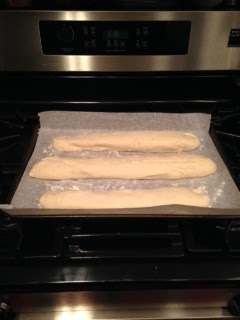
Slice the top of your french sticks at an angle with a sharp knife when they are puffed and ready for baking.  

Pop them into the top of the oven, and quickly pour the cup of water into the bottom pan (see pic below).  Be prepared for a rising cloud of steam… but it will help make your baguettes nice and crusty.

Bake until crispy and golden, about 35 minutes. 


Remove to cool slightly before serving with butter.

Mmmmmmm... enjoy!


Recipe adapted from Laura Vitale.


Sunday 17 January 2016

Bread... let me count the ways

I love bread.  I simply love it.  

If I am hungry, it's what I reach for.  If I am feeling sick, I rub it with garlic, and it makes me feel better.  Bread satisfies the tooth.  It's a great snack.  It completes a meal.  

My dad agrees with me.  He even likes to have a slice of bread slathered with butter and red jam (yes, it must be red!) as a kind of dessert.  I come by my love for all things bread honestly.

I've always been a bit intimidated by the "mysterious" bread making process.  A few years ago, I decided to finally demystify the process for myself and just learn how to make it.  I began to play with yeast recipes... I started with cinnamon rolls and pizza.  I experimented with no knead breads for awhile, but I found myself really enjoying the satisfaction of kneading my nourishment with my own two hands.  

Now I love making bread.  These gorgeous french sticks are so perfect... they're crunchy and crusty on the outside and super fluffy with just the right amount of bite on the inside.. and they're practically fool proof in the making of them.  


This picture was snapped after my very first try at french sticks.  You simply must try making them sometime.  

Making bread is not a quick task.  It takes time and patience, but not much effort, truly.  It's really a matter of timing... the proofing of the yeast, the simply mixing of the ingredients, the physically comforting and oh so satisfying process of kneading the dough... and the waiting, the patient waiting for the rise... the smell, the anticipation, the luxury of going about your day knowing there is something amazing coming in a few hours.  Ahh, I need to make some TODAY.

Will have to snap some pics of the process... for now, this little post will have to be a little teaser of the recipe to come.  


Wednesday 13 January 2016

Chicken Soup's On!


I am a big fan of homemade anything, especially soups.  I've been feeling this cold and snowy winter weather AND fighting something, so I figured some super easy, super comforting, and super healing chicken soup was in order. Craving greens, I added a luscious and nutritious parsley garnish to the bowl before eating it.

The ingredients:  
Chicken thighs and legs (2 large, bone in, for better flavour)
Onions (1 large or 2 small)
Celery (2 stalks with the leaves on top)
Carrots (2 medium)
Some parsley root (I keep this chopped and frozen, ready for soups) 
Garlic (as much as your body craves!)
Fresh parsley
S+P
Frozen peas and green beans at the end (a cup or so each)


Throw everything into a pot with some water and bring it to a boil... then simmer until the flavours have developed and the chicken is cooked and tender.  Remove the skin and bones and shred the chicken by hand.  Toss in some frozen peas and green beans... and you're done!

To make the parsley garnish, simply clean and wash some fresh Italian parsley, and buzz it in the food processor with some olive oil, freshly ground black pepper, and a pinch of sea salt.  


This is so very much like chimmichurri, which I make for topping our Sunday steaks... but this simple mixture will be great to add to a multitude of other dishes, like grilled chicken, or any salad, or baked / boiled / roasted potatoes.  Ohhh... what a great way to feed my obsession with all things green.  DO try this and enjoy feeding yours!  

Saturday 2 January 2016

why Taste the Love?

Welcome to my little kitchen blog.  I am so glad you popped in!
Cooking and baking have always been a passion for me.  I am almost always thinking (or dreaming!) about food and my next kitchen creation!   I remember baking and helping mom cook in the kitchen from a very young age.  When I travel, you'll find me making lists of what I want to eat, and then snapping pictures of all my meals.  I do it at home, too, sneaking pictures of dinner as it's cooking, or coming out of the oven, or even after tasting it on my plate.  I try to capture the special essence of what I have prepared... which brings me to the reason behind this blog.  

Taste the Love will be more than a place for collecting my pictures, writing a food journal, or sharing recipes or memories with family and friends... though I expect it will become all of those things.  It is my hope you can taste the love that is put into every little thing I prepare for those closest to me.