Showing posts with label Bread!. Show all posts

Friday, 1 May 2020

Care and feeding of your sourdough starter

How do I keep my starter ALIVE?!


Now that I have your attention... relax!
  
It takes a lot to “kill” your starter, truly. 

But really ... as long as you bake with it regularly (even just once a week), it will be happy and bubbly and ready to lift your sourdough to new heights.  Bake more often than that, and you’ll have a superstar performer on your hands.


You can take a mathematical approach, and actually measure your flour and water, so you KNOW it will be just right.

And after awhile, you’ll get a real “feel” for it, and then you’ll be doing it much more instinctively as you gain experience and confidence. You’ll also develop a preference for how wet or dry you like to keep your starter.  I like to keep mine on the thicker side, so I can really see it puff up and double (or more).  Here’s how I feed and mix mine, in this short video:

Remember, you’re the one who gets to decide how much starter to keep in the fridge at any given time.  I like to keep only a bit more than the scrapings if I only plan to make one loaf... but if I’m planning to make up some pancakes or waffles on the weekend, or to do a big bake of three loaves in a day or two, then I build it up by a bit by feeding and mixing it, and leaving it out an hour before I pop it back in the fridge, so I’ve got enough to use when I need it.


It’s ready to bake with, when it is bubbly, has more than doubled,  and it is still rounded at the top.


~ TROUBLE SHOOTING ~

If your starter is a bit sluggish, and doesn’t see to want to grow, consider the following:

Is your kitchen warm enough?  
Put it in the oven with the light on, 
put it on top of your refrigerator, or near a warm spot.

Is there a draft inhibiting its growth?  
Pop it in the microwave or invest in a proofing box.

Did you feed it “enough” flour?  
Add some more!  Or change up the flour (try some rye or spelt)


Happy starter = happy sourdough!


Happy sourdough = happy eating!!


Good luck and HAVE FUN!!!!

MJ


Tuesday, 14 March 2017

Hot Cross Buns in loaf form


Hot Cross Buns

Hot cross buns,
Hot cross buns,
One a penny, two a penny,
Hot cross buns.

Yes, the song has become a loaf in my house.  I learned how to make these buns a year or two ago, thanks to the recipe found on Laura in the Kitchen... oh, they're so so so so good. 

Anyway, our toaster oven has been replaced by a regular toaster, so toasting and reheating those icing crossed buns is no longer an option.  Enter, the hot cross bun / loaf.

Here's how to make it:

Combine 1 cup milk, slightly warmed, with
2 1/4 tsp dried baking yeast and a spoonful of sugar
Proof 5 min, or until bloomed

Melt 1/4 cup of butter and let it cool
Bring 2 eggs to room temp, I usually just run them under some warm water for a minute

In a big bowl, mix 3 3/4 cups flour
1/2 cup sugar
1 tsp salt
2 tsp cinnamon
1/2 tsp ginger
1/4 tsp cloves
1/8 tsp cardamom
zest of an orange or lemon or both

Add in the cooled butter and two eggs
Also, add in a generous 1/2 cup of raisins and a small container of candied citrus peel

Stir with a wooden spoon only until a sticky dough forms and the raisins / peel are well distributed, for the most tender result.

Cover and let rise slowly in a warm place, until doubled in size
This is what it looks like about 15 minutes into the rising process


Do enjoy!!


After an hour or so, when the dough is doubled and fluffy, cut it in half, and press gently into two loaf pans lined with parchment paper.

Let rise a second time, for about 45 minutes, until each loaf is domed and ready to bake.  Brush with butter or an egg, if desired.

Bake at 375 degrees F, for about 30-35 minutes, or until golden and baked all the way through.
Let cool on a wire rack before you dig in!


Umm, yes, I confess, those are my teeth marks, eep!  I already started eating the first slice before realizing I needed to snap a picture or two... here's one with some lovely melting action.


Do enjoy!


Special thanks to #mrsvitale

Sunday, 3 April 2016

Kranzkuchen... Oma's Easter Bread recipe


There's nothing in the world like homemade bread... the mere touch and smell of this dough brings me back to my childhood and learning to make Kranzkuchen with my Oma.  It's something I remember so vividly once I get my hands on the yeasty, sticky wonderfulness.

Truth be told, for many years, I was afraid to try making it.  I just didn't want to get it wrong. You see, the recipe we have is simply a list of the few ingredients involved, and there are absolutely no instructions or tips on the scrap of paper the "recipe" was written on.  

After a few years of missing it / wanting to make it and eat it... and wanting to honour our dear late Oma and Opa and Onkel Joe who are inextricably wrapped up with the tradition of this bread, I just HAD TO attempt making it, as it means EASTER to everyone in our family.

And guess what?  It turned out more than just OK, it was perfect... the touch, the smell, the texture... it was EASTER in a simple braided loaf.


This is how to make it.  

1) In a two cup measuring cup, proof 4 1/2 tsp yeast with 2/3 tsp sugar in 1/2 cup warm water until it gets foamy and yeasty smelling.  Notice how mine was a bit overflowing?  My one cup measure overflowed!

2) Measure 7 cups flour and 1 generous tsp salt into a very big bowl and stir to combine

3) Melt 2 tsp butter in a large measuring cup, add    2 3/4 cups of milk and 2 eggs

4) Combine everything in the big bowl.  When it comes together roughly, turn it out onto the counter and knead using a dough scraper and an additional 1/4 cup of flour or so, as needed.  This is a sticky dough so don't go crazy with the flour, as it will still be sticky.  Pop it back into the big bowl when the texture is nice and smooth, after about 7 minutes of kneading.  Let it rise for an hour, covered, in a warm draft-free place.   

5) Dump onto a floured surface to shape into desired loaf shapes.  I split the dough in two... made a simple three braid with tucked under ends... and a round loaf by forming 6 strips and weaving a simple 3 x 3 lattice with the ends rolled under.    


The simple braided loaf is my Opa's favourite shape (and mine).  The round loaf was Oma's favourite, and I think it's my mom's, too.  These are the two simple shapes I made with this year's batch of dough.  I might experiment with a four or five strand braid next year.

I will have to watch how vlogger Titli Nihaan @ The Bread Kitchen shows how to do it... she can braid anything from 3 to 9 strands of bread.  https://www.youtube.com/watch?v=RP6j7esQyjk 
Be sure to check the link out!


6) After letting the braided loaves rise about 45 minutes, brush them with a whole egg and pop them into a preheated 400 degree F oven for about 20 to 30 minutes. 


I rotated and turned these loaves from top to bottom and front to back so they browned evenly.  I knew they were done when they turned a deep golden colour, and they made a nice hollow thumping sound when knocked on the bottom.


These braided beauties make me smile.


Happy Easter!  He is Risen!  He is Risen, indeed!


I think Oma and Onkel Joe (the former bakers of this bread) would be proud this traditional Kranzkuchen is still being enjoyed in our family this Easter.

Please comment if you have tried this recipe, or if you have a family recipe that you simply must have every year on Easter or other special days.   

If you have any questions about my recipe or process, please ask and I will respond in kind.

Edited to add:
Good luck to my dear friend Suzanne, who will be trying this recipe during the Pandemic / Bread Explosion of 2020!
And kudos to my brother John, who made for Easter Sunday this year.


Tuesday, 19 January 2016

Bread... the Recipe

OK, so here’s how you make these scrumptious french sticks.
Assemble your ingredients... you need only flour, sea salt, yeast, and olive oil. This is my first try with this Italian flour. Not to worry, I have made these baguettes with regular all purpose flour, with terrific results.


Mix and proof for 5 min or until blooming and scented:
1 ½ cups of warm tap water in a measuring cup
1 tsp sugar (the sugar will help feed your yeast)
1 ½ tsp yeast  

Pour the yeasty liquid into 3 ½ cups of flour and 2 tsp salt and mix with a spatula... until a ragged dough ball sticks together.  Don't worry if it's all craggy and lumpy. It's totally ok.

Dump it onto the counter and then knead it for about 5 minutes, until the dough is relatively smooth.

It should look like this (below) once you've kneaded it a bit... see how all the flour has been picked up by the dough ball?


Pop the dough back into the same mixing bowl (no need to clean it) and slick it with some olive oil.  Cover it with a clean dry tea towel, and let it rise for an hour, or until it has doubled in size.  I let mine rise on the stove after having turned the oven on for a few minutes, so it is always nice and warm for good rising.

Dump that gorgeous ball of dough onto the counter, which should be sprinkled lightly with flour.  

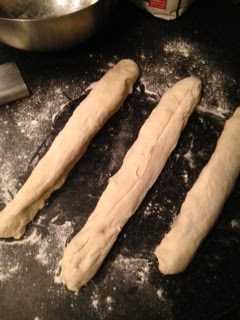
Cut and shape the dough into 3 or 4 french sticks, placing them onto floured parchment paper.  Don't be all picky about them looking perfect... those lumps and bumps make it extra crusty and perfectly imperfect after baking.

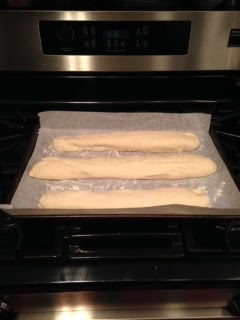
Let the formed baguettes rise for a second time (covered). This should take another hour.

Preheat your oven to 475 degrees Fahrenheit with a foil pan or baking pan onto the bottom rack of the oven. You’ll be tossing a cup of water into that pan when you pop the baguettes into the hot oven.
Slice the top of your french sticks at an angle with a sharp knife when they are puffed and ready for baking.  

Pop them into the top of the oven, and quickly pour the cup of water into the bottom pan (see pic below).  Be prepared for a rising cloud of steam… but it will help make your baguettes nice and crusty.

Bake until crispy and golden, about 35 minutes. 


Remove to cool slightly before serving with butter.

Mmmmmmm... enjoy!


Recipe adapted from Laura Vitale.


Sunday, 17 January 2016

Bread... let me count the ways

I love bread.  I simply love it.  

If I am hungry, it's what I reach for.  If I am feeling sick, I rub it with garlic, and it makes me feel better.  Bread satisfies the tooth.  It's a great snack.  It completes a meal.  

My dad agrees with me.  He even likes to have a slice of bread slathered with butter and red jam (yes, it must be red!) as a kind of dessert.  I come by my love for all things bread honestly.

I've always been a bit intimidated by the "mysterious" bread making process.  A few years ago, I decided to finally demystify the process for myself and just learn how to make it.  I began to play with yeast recipes... I started with cinnamon rolls and pizza.  I experimented with no knead breads for awhile, but I found myself really enjoying the satisfaction of kneading my nourishment with my own two hands.  

Now I love making bread.  These gorgeous french sticks are so perfect... they're crunchy and crusty on the outside and super fluffy with just the right amount of bite on the inside.. and they're practically fool proof in the making of them.  


This picture was snapped after my very first try at french sticks.  You simply must try making them sometime.  

Making bread is not a quick task.  It takes time and patience, but not much effort, truly.  It's really a matter of timing... the proofing of the yeast, the simply mixing of the ingredients, the physically comforting and oh so satisfying process of kneading the dough... and the waiting, the patient waiting for the rise... the smell, the anticipation, the luxury of going about your day knowing there is something amazing coming in a few hours.  Ahh, I need to make some TODAY.

Will have to snap some pics of the process... for now, this little post will have to be a little teaser of the recipe to come.